Android TopSheet - Implementation
Android Bottom Sheet Behavior explained and extended to create a Top Sheet component for Taskito. Read detailed analysis of behaviors and how to make a top sheet dialog.
BottomSheet is a famous Material Design component which has become ubiquitous in Android apps these days. Google has provided a good working implementation of the bottom sheet via the Material Design Library.
At Taskito, we heavily use the Bottom Sheet to provide meaningful interactions. With more features, comes more complexity related to navigation. There are a lot of apps which use the bottom sheet to show menu options.
Tapping a menu item in the Toolbar and showing a bottom sheet breaks the user flow. At the moment, user's attention is concentrated near the top of the screen. When the bottom sheet comes up, the user has to shift attention to the bottom and move the thumb as well.
😤 Having to constantly change the attention is not ideal. It could be frustrating for the user that they now have to move their thumb all the way to the bottom.
Top Sheet
Taskito does not use menu popup views and to keep the UI uniform throughout the app, we decided to add a Top Sheet.
A Top Sheet is similar to the Bottom Sheet. Instead of transitioning from the bottom, A top sheet transitions down from the top and sticks to the top of the screen.
It is not defined in the Material Design and may go against the guideline. But they are guidelines after all. Here's how it looks 👇👇.
Android Top Sheet Animation
This is a tiny GIF of one of the Top Sheet Dialog implemented in Taskito. It looks pretty smooth and behaves very similar to the Bottom Sheet Dialog. Read on to know how we implemented it.
🛑 Don’t reinvent the wheel
There are a few hacky implementation available for Top Sheet. I tried one of them and it didn’t work as expected. So I borrowedits implementation idea. Instead of trying to come up with a new solution, I checked the implementation of BottomSheet. It’s not as confusing as it looks.
I copied the necessary code verbatim and started probing around. Adding print statements can be quite helpful sometimes. Here’s how the Bottom Sheet is implemented.
Bottom Sheet Implementation
- The bottom sheet works only within a CoordinatorLayout. So if you want a BottomSheetDialog, you create a CoordinatorLayout and put your content inside it.
- BottomSheetBehavior is the core. It defines when to expand, when to collapse, different states, etc.
BottomSheetBehavior
It may look confusing but it’s well written and easy to understand. There are 3 main methods that require your attention.
- onLayoutChild: It’s invoked when you add the bottom sheet content to the parent CoordinatorLayout. It’s usually called only once at the beginning. Determine where to put the bottom sheet content on the screen/parent.
- onNestedPreScroll: Called when user has started to scroll/drag the sheet. This method detects overscroll and stops it (stop user from expanding the sheet if it’s already in the expanded state).
- onStopNestedScroll: Called when the user stops dragging the sheet. This method determines the new state (collapsed, expanded) based on the dragging position and finalizes the state if necessary. (if user has dragged the sheet below collapsed offset, change state to collapsed and collapse / hide the sheet).
There’s other important code about animations and stuff, but it’s not a concern at the moment.
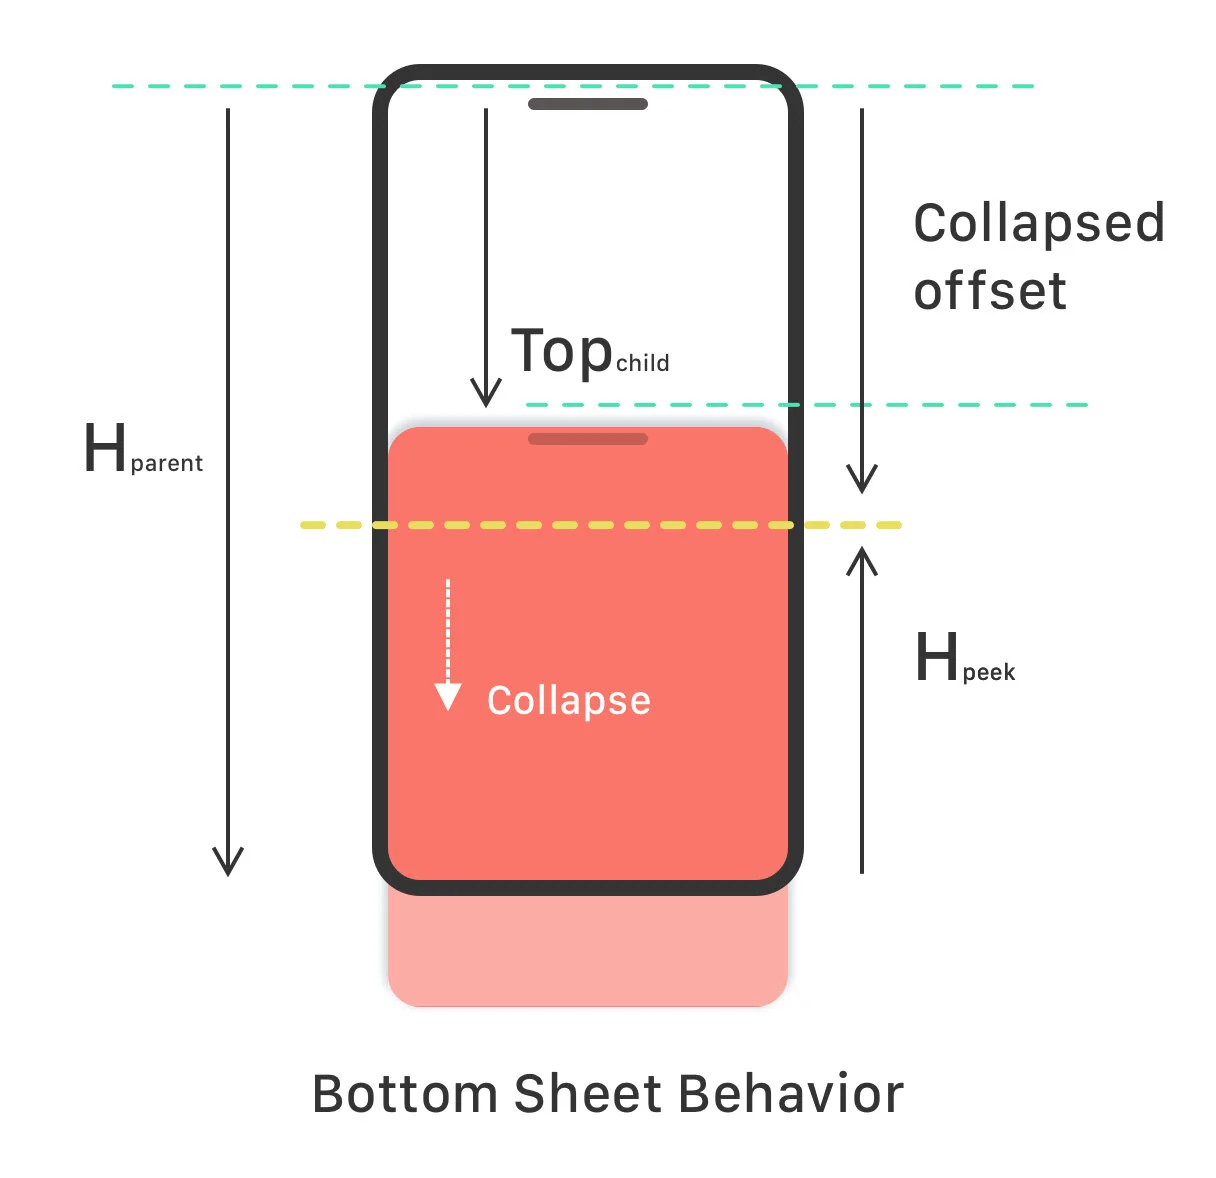
Read on to get more details about these methods. Please refer to the illustration below.
- Hparent – Height of the bottom sheet parent.
- Hpeek – Peek height of the bottom sheet. The height that should be shown when the bottom sheet is added/shown.
- Ocollapse = Hparent - Hpeek – Collapse offset. If the sheet is dragged below it, it should be collapsed/dismissed.
Everything is measured from top-left corner as the origin.
Android Bottom Sheet behavior explained
📏 All these methods calculate child’s top (distance from top of the screen/parent) based on drag and state.
onLayoutChild:
Find content top » topchild = Hparent - Hpeek. Offset the child top by the given value.
onNestedPreScroll:
Find the new content top » new_topchild = topchild + dy.
if (dy > 0) {
    // dragging upwards.
    if (newTop < offset) {
        We have crossed the offset threshold.
        Change the state to expanded.
    } else {
        Change state to dragging.
    }
} else {
    // dragging downwords
    if (newTop > offset) {
        Change the state to collapsed.
    } else {
        Change the state to dragging.
    }
}
onStopNestedScroll:
This is the method that determines the final state of the bottom sheet. In the simplest terms, it compares the current top position of the child to determine the next state (expanded, collapsed, etc) and starts animation to finalize it.
In the simplest terms,
if (currentTop < offset) {
    newTop = expandedOffset
    newState = STATE_EXPANDED
} // ... more conditions
Top Sheet Implementation
🎯 My goal was to replicate this behavior, but for a sheet that transitions from the top. It turns out that we need even less calculations to do this.
I copied BottomSheetBehavior class and renamed it to TopSheetBehavior, BottomSheetDialog to TopSheetDialog and also copied the bottom sheet dialog layout file for the top sheet dialog.
Build » Run » It completely replicates bottom sheet behavior. Now, towards fiddling.
In the BottomSheetBehavior, the content was laid out based on its top position. In TopSheetBehavior, it will be laid out based on its bottom position which is easier to determine.
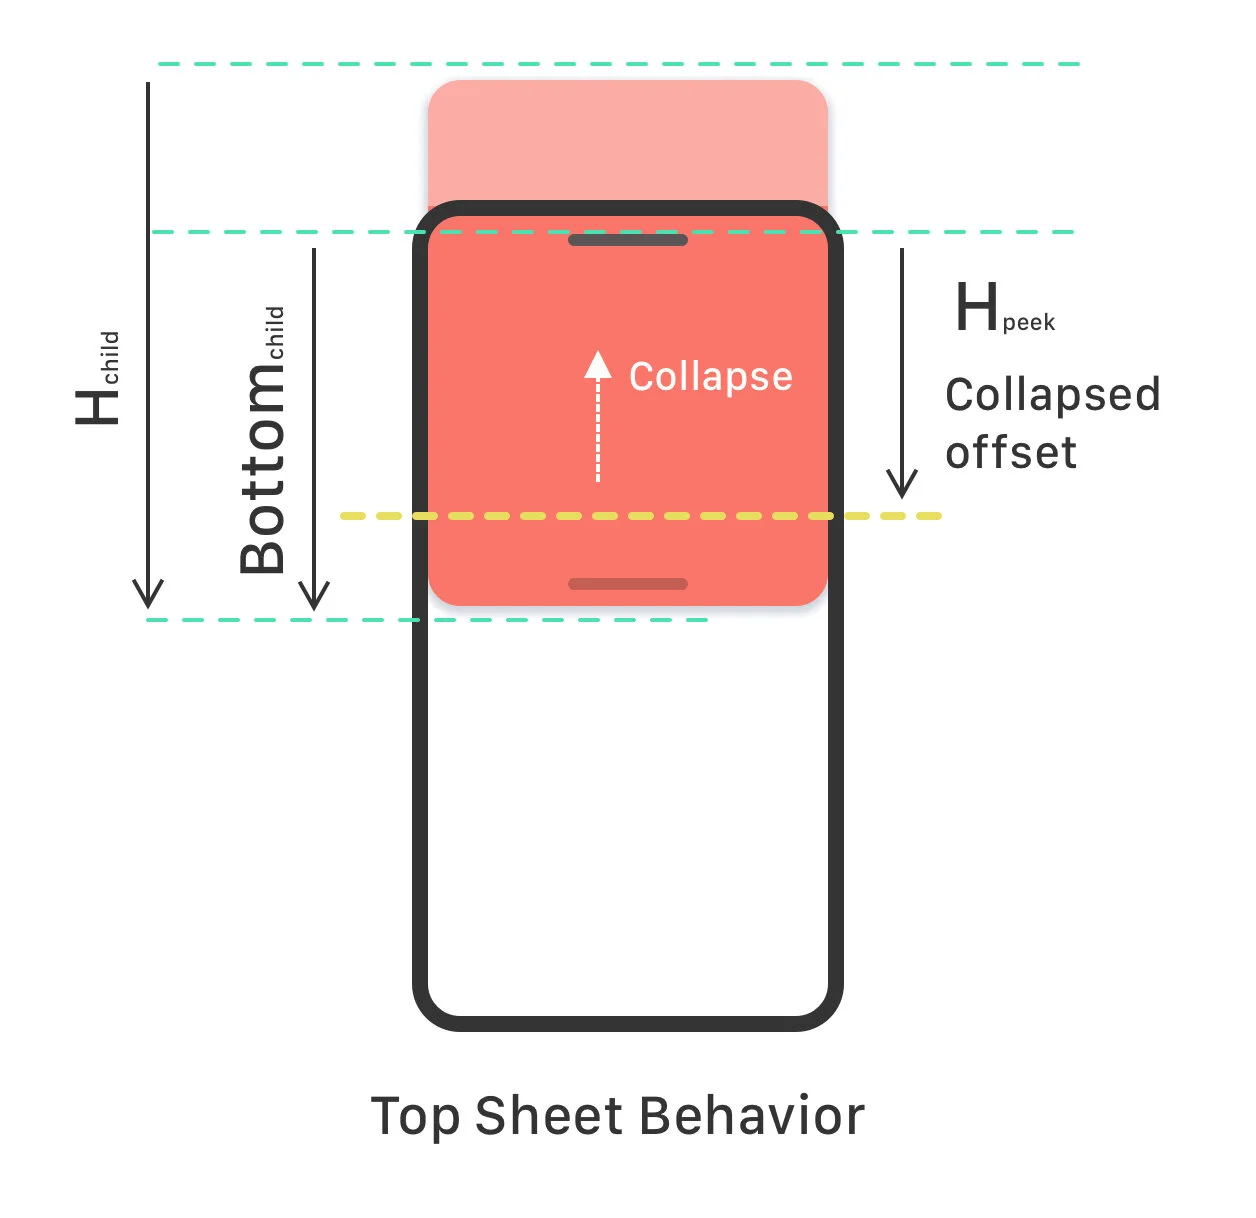
Android Top Sheet Behavior explained
Here, the height of the parent does not matter that much. Collapsed offset is simply the peek height of the bottom sheet.
Ocollapsed = Hpeek
onLayoutChild:
Find content bottom »
- bottomchild = Hchild - Hpeek.
- topchild = - Hpeek
Offset the child top by the given value.
onNestedPreScroll:
Similar to the bottom sheet, we find the new bottom and just reverse the conditions. new_bottomchild = bottomchild - dy.
if (dy > 0) {
    // dragging upwards. This movement could collapse the top sheet.
    if (newBottom > collapsedOffset) {
        Change the state to dragging.
    } else {
        Change state to collapsed
    }
} else {
    // dragging downwords
    if (newBottom > expandedOffset) {
        Change the state to expanded.
    } else {
        Change the state to dragging.
    }
}
onStopNestedScroll:
Determine the final state of the top sheet. We compare the current bottom position of the child to determine the next state (expanded, collapsed, etc) and starts animation to finalize it.
In the simplest terms,
if (currentBottom > offset) {
    newBottom = expandedOffset
    newState = STATE_EXPANDED
} // ... more conditions
This was a very simplified explanation of the BottomSheet and the TopSheet behavior. There are other states and cases to consider: Collapsed, Hidden, Half expanded, Expanded.
I couldn’t fit all the explanation in this post. I have also not created a Github repository or library of this fiddling.
✅ To recap, I used the existing implementation of Bottom Sheet and tweaked it to create Top Sheet implementation in Android.
Code
You can find the relevant code & the brief guide on Github - Top Sheet Implementation for Android. Feel free to modify the code to fit your needs.
If you liked the content, you can support Taskito.
Related Articles
Feature rollout with Firebase remote config
Taskito used Firebase Remote Config feature to gradually rollout the cloud sync feature with percentage rollout mechanism. Here's how it went…
The Indie Dev's Guide to grow your app
Mobile apps market is highly competitive and it's difficult to sustain your growth as an indie developer with limited resources. Check out different things we tried to grow Taskito to 300K+ downloads.
Android: Views with custom states
Learn how to add custom view states in Android. This guide covers creating and managing custom drawable states using XML, improving UI consistency with custom state attributes, and enhancing your Android app's user experience.